1. Log in
|
| Figure 1 - Logging in (on Safari) |
|
To log in, you should use the following URL
http://.../mailer
You will be asked to enter the user_name and password you have been assigned.
You cannot change your user_name, but you can change your password any time you like
(see section User properties, later in this page).
Your identification will stay in place for the whole session.
To log out, you must end the navigator session (close the window).
Once logged in, you would receive a screen as the one in Figure 2
Important note. The login validation procedure requires system value QRETSVRSEC be set to 1.
Continued failures to login may depend from the fact that system value QRETSVRSEC is still set to 0.
|
|
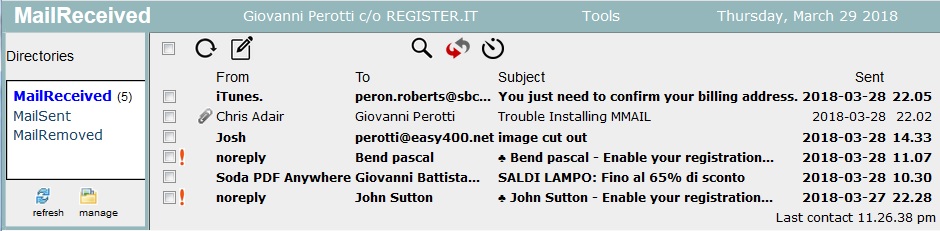
| Figure 2 - Initial screen |
The screen is made up of three frames:
- a thin top frame, dark cyan
- a left frame
- a right frame
Let us go through them.
- Top frame
This frame contains four items, left to right:
- The name of the mail directory (folder) being displayed in the right frame
(in this case, MailReceived)
- The full name of this user.
If you click on this name, you open a popup window showing the properties of your profile.
You may also change properties, for instance your password
(for details, see section User properties at the end of this page.
- A link to the Tools window (see Appendix D).
- Current date and time, updated on a one minute cycle.
- Left frame
This frame contains a list of the available mail directories (folders) for this user.
The directory currently displayed in the right frame is in bold characters.
Each directory may display a number within parethesis: that is the number of mail messages not yet opened.
Click on a directory name to display its contents.
Three default mail directories are provided:
- MailReceived contains the incoming mail
- MailSent contains the outgone mail
- MailRemoved contains the mail that you have temporarily removed from other mail directories and
is waiting for final deletion.
Of course you may create new mail directories and move or copy mail messages from a directory to another directory.
This is discussed in section Organize mail.
Two small icons are available at the end of this frame.
- The one labeled refresh just refreshes the list of the directories in this frame
- The one labeled manage allows you to create, rename, delete mail directories.
For detailson this, please refer to section Organize mail.
- Right frame
This is the heart of mail processing. Mainly in this frame you have:
- a stack of control buttons
- a list of the mail messages available in the current directory
(you may change mail directory by clicking another directory on the left frame)
- some check all uncheck all links
- list of mail messages
- one message per row
- message columns for sender, receiver, subject, send date & time
- messages not yet opened are in bold characters
- to open a message, either click on any field of its row, or double click on its check button
- control buttons
 |
This is for receiving new mail. For details about receiving mail, see section
Receive mail | .
 |
This is for creating a new message to be sent. For details about sending mail, see section
Create and send a message | .
 |
Click this icon to remove all checked-in messages.
This icon shows up only when at least one message is checked in.
For details about removing messages, see section Remove mail. |
 |
This is for replying to the sender of a message. It requires that you select first - through its check box -
the message to be replied. For details about replying to messages, see section section Reply-to message. |
 |
This is for replying to the sender of a message and copying all the people on the origina distribution.
It requires that you select first - through its check box - the message to be replied.
For details about replying to messages, see section section Reply-to message. |
 |
This is for forwarding a message.
It requires that you select first - through its check box - the message to be forwarded.
For details about forwardinging to messages, see section section Forward message. |
 |
This allows to display the messages in the list that match a given search string.
When you press this button, the following is displayed: |
 |
You should enter the search string (over the Search for ... saying) and press the green magnifier icon.
All the messages in the page are searched for such a string in the fields From, To, and Subject and only the ones
matching are listed.
To return from the subsetted list, just press the next icon, the "refresh" one (see next).
|
|
 |
Press this icon to refresh the message list. |
 |
Click this icon to enable a self-mail receive. A time interval of "n" minutes is set. As soon the the time interval expires, a request to check for new mail is issued
and a new time interval is started.
The number of minutes for the time interval can be set from the "Tools" window, see Appendix D.
While this never-ending self-mail receive cycle is active, the icon is replaced by a flashing light icon (see next). |
 |
This flashing light icon warns that the self-mail receive is active. Just press this icon to stop the self-mail receive function. |
Figure 3- Control buttons
2. Create and send a message
|
Click the icon "write new message" to create and send a new mail message.
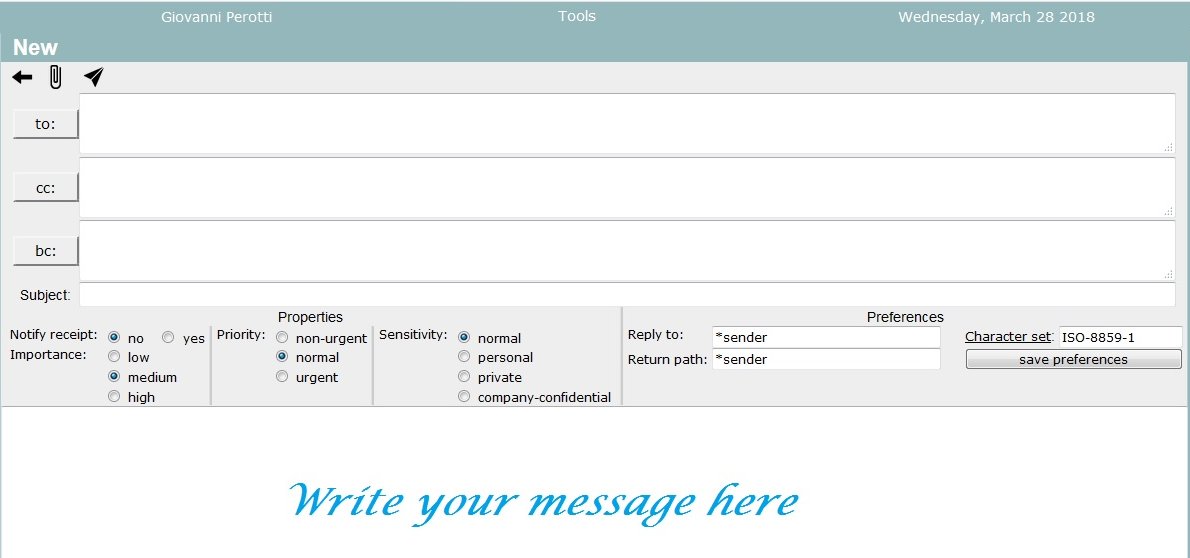
When you press this icon, the screen in Figure 4 appears: |
|
|  |
| Figure 4 - Creating a mail message |
Focus areas in this screen:
- control buttons
- address buttons and text areas
- subject
- message properties
- message preferences
- message text area
- Control icons
Just three control icons are available:
 |
Press this icon to give up creating a new message and to go back to the previous screen. |
 |
Press this icon to add attachments to this message.
Providing attachments is discussed later in this section. |
 |
Press this icon to send the message.
Outgone messages are stored in the MailSent directory. |
- Address buttons and text areas
Three text areas are available for entering distribution addresses: one for the To-distribution, one for the Cc(Carbon copy)-distribution,
one for the CCn(Blank copy)-distribution.
You may enter addresses manually, if you like, for instance by copying and pasting them.
The name of a recipient is not mandatory, while the e-mail address is.
The mail address must always be within acute brackets ( <...> ).
Multiple destinations must be separated by commas.
Some examples:
| |
John Brown <brownj@starmail.com> |
| <dianaht@starlett.net> |
| John Brown <brownj@starmail.com>, <dianaht@starlett.net>, Tom Dooley <tomd@iseries.com> |
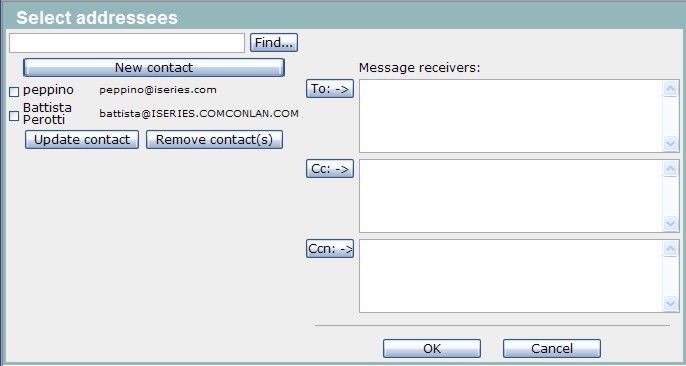
The address buttons provide a convenient way to maintain an address book and to pick destination addresses from there.
Pushing one or the other of the three address buttons makes no difference.
The following popup is displayed:
- Picking contacts
In order to pick contacts and have them added to the address areas of the new message, operate as follow:
- Select the contacts to be in the TO-destination and press the "To" button
- Select the contacts to be in the CC-destination and press the "Cc" button
- Select the contacts to be in the CCN-destination and press the "Ccn" button
- Press the OK button
- Finding contacts
The "Find" button helps in finding contacts from a huge address book.
Operate as follow:
- enter a search string and press the "Find" button
- only the names containing the search string are listed
- blank out the search string and press the "Find" button to display the full list
- Adding contacts
To add a new contact, press the button "New contact"
- Updating contacts
Select the contact to be updated and press the button "Update contact"
- Removing contacts
Select the contacts to be removed and press the button "Remove contact(s)"
- Message properties
The following message properties:
- Notify receipt (request to the receiving mailer to send a return receipt when the message is opened)
- Importance
- Priority
- Sensitivity
can be set through the appropriate radio buttons.
Such message properties may be handled differently from one receiving mailer and another.
- Message preferences
A subset of the user properties ("Options for sending e-mail", see for instance
Defining an Internet User)
- character set
- reply-to e-mail
- return path
may be changed just for this message, or permanently by pressing button "Save preferences".
- Message text area
Write the text of your message in this area.
The message is sent as TEXT/PLAIN.
TEXT/HTML is not supported.
Providing attachments
You may attach files to your e-mail message, by pressing the Attach button.
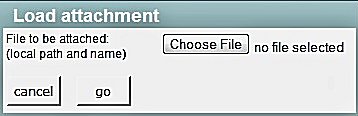
The following popup is opened:
|
| Figure 6 - Attaching a file |
- Press the "Browse..."/"Choose File" button to select the file to be attached
- Press the "go" button to transfer the file from the client to the HTTP server.
|
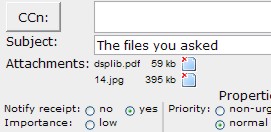
Figure 7 shows the excerpt of an outgoing message, with two attachments.
- to display an attachment, click on its name
- to remove an attachment, click on the related
 button
|
| Figure 7 - Outgoing message with attachments |
3. Receive mail
|
Icon "receivemail" in Figure 2 is the one to be pressed for checking and receiving the incoming mail.
This icon, when pressed, posts a receive-mail request for the appropriate username to the AMailer "Mail receiving and delivering system",
see Appendix B for more information.
That not only returns the received mail, but also some feedback messages.
|
- Examples of feedback messages
There are three cases:
- The feedback message has the format
user-name's mail-receive locked by another task
Another task has beed assigned the exclusive responsibility of receiving mail messages for this user-name.
Refer to Appendix B to know more about this case.
- The feedback message has the format
no new messages (out of yy in the POP server)
Its meaning is as follow:
- no new messages were received
- If the user profiles specifies that messages should be retained on the POP server until they are locally deleted,
- the POP server is currently storing yy mail messages, because they are not yet locally deleted.
- The feedback message has the format
xx new messages (out of yy in the POP server)
Its meaning is as follow:
- xx new messages were received; they are listed (bold characters) at the end of the message list
- If the user profiles specifies that messages should be retained on the POP server until they are locally deleted,
- the POP server is currently storing yy mail messages.
- xx are the new messages just delivered (and kept on the POP server)
- yy-xx are messages kept on the POP server because not yet locally deleted.
- no feedback message displayed.
If this happens, it means that the POP Client failed logging in at the POP server.
This may be due to one of the following:
- the POP server could not be contacted (either port 110 of the iSeries is not active, or the IP address of the POP server is not correct)
- the username or the password used to login at the POP server are wrong
4. Display message
To display a message, click on any column of the message row (Figure 2) or double click on
its check-box.
You are displayed something like this:
|
| Figure 8 - Displaying a message |
AMailer supports two types of Content-type for message body:
Within Content-type: text/plain, Content-Transfer-Encoding: quoted-printable is also supported.
- Attachments
Attachments are listed in the message header.
Click on the name of an attachment to display it in a new window.
Attachments are extracted from the MIME message file and converted at message-receive time.
Conversion is supported for Content-Transfer-Encoding's:
To display an attachment, click over its file name.
- Message Properties and Message Source icons
In the right part of the message header (Figure 8) there are two small icons.
- Button
 ,
named message properties, opens a popup to display the properties of the message. ,
named message properties, opens a popup to display the properties of the message.
- Button
 ,
named message source, opens a popup to display the MIME file, as it was received. ,
named message source, opens a popup to display the MIME file, as it was received.
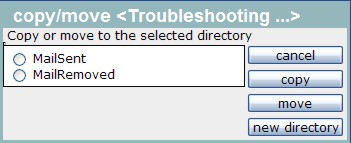
- The Copy/Move icon

|
Press this icon to copy or to move the message to another mail-message directory. |
The following popup is opened:
|
| Figure 9 - Moving or copying a message |
Select the target directory and press the "move" or the "copy" button.
Should you need to create a new mail-message directory, press the button "new directory" to create it,
then perform the copy or the move operation.
5. Reply-to message
|
|
Click this icon, either
in the screen of Figure 2 or
in the screen of Figure 8
to reply to a message.
|
You will receive a screen similar to the one used to create a new message (Figure 4)
except that
the "To" address is already filled in
the "Subject" is already set
the message text includes the text of the original message.
If the original message had attachments, they are attached again to the reply-to message, but you may optionally remove them one at a time.
|
|
Click this icon, either
in the screen of Figure 2 or
in the screen of Figure 8
to reply-all to a message.
|
You will receive a screen similar to the one used to create a new message (Figure 4)
except that
the "To" address is already filled in
the "Cc" address is filled in with all the other addresses existing on the original message
the "Subject" is already set
the message text includes the text of the original message.
If the original message had attachments, they are attached again to the reply-to message, but you may optionally remove them one at a time.
6. Forward message
|
|
Click this icon, either
in the screen of Figure 2 or
in the screen of Figure 8
to forward a message.
|
You will receive a screen similar to the one used to create a new message (Figure 4)
except that
the "Subject" is already set
the message text includes the text of the original message.
If the original message had attachments, they are attached again to the forwarded message, but you may optionally remove them one at a time.
7. Organize mail
By "Organize mail" we mean the ability to create, rename, remove mail directories (folders) and to move and copy
mail messages from one directory to another directory.
Three directories are given as default:
MailReceived, MailSent, MailRemoved.
You may move and copy mail messages from / to these directories, but you cannot rename nor remove them.
To move and copy a message from one directory to another directory, you must first display the message, then to use the
"Copy/Move" icon.
In addition, you may create your own user directories, that you can also rename and / or delete.
The facility that allows to maintain user directories is activated from the button
 at the bottom of the left frame (Figure2).
Some images of this facility:
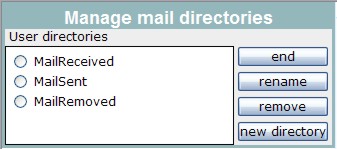
Figure 10- The default directories |
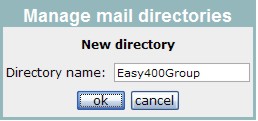
Figure 11- Adding an user directory |
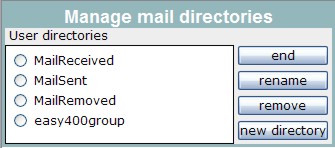
Figure 12- User directory added |
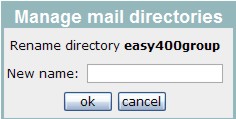
Figure 13- Renaming an user directory |
|
| Figure 6 - Attaching a file |
8. Remove mail
You may remove mail
- From the list of messages of a given directory (Figure 2),
by checking the check-boxes of the messages to be removed, and pressing the "Remove" icon
- When displaying a single mail message (Figure 8), by pressing the "Remove" icon.
At this stage, a message is not deleted yet. It is moved into the "MailRemoved" directory.
To delete a message then, you must remove it from the "MailRemoved" directory.
What however happens at this point, dependes from some options in your profile (see section User properties).
- if your profile tells "not to retain messages at the POP server once they have been received", your message
is deleted as soon as it is removed from the "MailRemoved" directory
- if your profile tells "to retain messages at the POP server after they have been received, your message
- when it is removed from the "MailRemoved" directory - is not deleted, but "marked for deletion".
It will no longer show up in the "MailRemoved" directory, and will be deleted only during the next login of this user
at his POP Server. In fact, the local message record contains the ID assigned to this message by the POP server, and
this ID id needed by the POP client to tell the POP server that it can remove its message for good.
The exact timimg of message deletion makes no difference from a user perspective,
inasmuch the user has no control on it.
9. User properties
You may access your profile properties by clicking on your name on the top frame of an AMailer
screen (see Figure 2).
You may then change, for instance, your password, your options for sending mail.
You should however be very careful not to change by mistake your username at the POP server and the IP address of your
PPOP server. Errors would impair the ability of the AMailer POP client to login at the POP server
and to receive your mail.
For more information on this topic, please refer to chapter Define users
and section Define an Internet user
or Define an Internal user.
10. Data privacy
It must be understood that all the mail messages and their attachments are stored on the iSeries, within its
Integrated File System structure. Messages and attachments are not ciphered, nor are the Amailer application records
(except two record fields, POP server user names and passwords).
However, accessing from the outside and from the internal site the AMailer data is not easy for a number of reasons:
- Message stream files stored on the IFS can be accessed only via CGI programs (user profile QTMHHTP1)
- Attachments stream files stored on the IFS can also be accessed via an HTTP URL (user profile QTMHHTTP),
however, it is not so easy to find what their URLs are
- The way stream files are named and organized through directories, though rather simple in concepts, is hard to be understood by
anyone not familiar with the internalities of Amailer
Potential users should therefore be made aware of some potential risk on their data privacy.
|