|
1. The WRKDBF banner
All the WRKDBF pages show the banner in Figure 1.
 |
| Figure 1 |
Beside the system name of the box where WRKDBF is running, this banner provides other useful information:
- The release date of the WRKDBF version installed on this box.
Please note that the running version could bnot be the latest one.
- To know about the latest version of WRKDBF, you should click the following image:

- To access the WRKDBF user manual, you should click the following image:

2. Selecting a database file
 |
| Figure 2 |
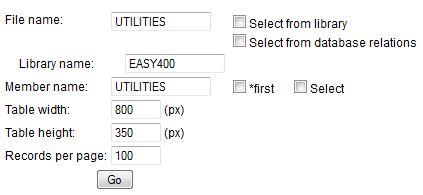
Figure 2 shows the WRKDBF initial screen.
In order to specify the database file you want to process, you have several options:
- Type the database file name in field File name, type its library name in field Library name.
- Type a library name in field Library name and click the checkbox Select from library.
You will receive a list of database files in that library, and you will have to select one of them.
- Type a generic file name in field File name, type a library name in field Library name and click the checkbox Select from library.
You will receive a list of database files in that library matching the file generic name, and you will have to select one of them.
- Type a physical file name in field File name, type its library name in field Library name
and click the checkbox Select from database relations.
You will receive a list of logical files based over that physical file, and yiu will have to select one of them.
Once you have specified the database file name you want to work with, if that is a multimember file, you may further
specify the name of the member you want to process. If you do not recall the appropriate member name, click the check box
Select to receive a list of members to select from.
- In field Table width you may specify the width - in pixel - of the records table.
- In field Table height you may specify the height - in pixel - of the records table.
- In field Records per page you may specify how many records should be displayed in the records table.
This type of information can be subsequently changed.
When you press the Go button, a special process takes place:
- A check is made to find out if RPG programs to display / update the database file are already available within WRKDBF.
- If not yet available, they are generated on the fly.
- Next, the display program is executed to show the first records of the database (Figure 3).
3. Displaying database records
 |
| Figure 3 |
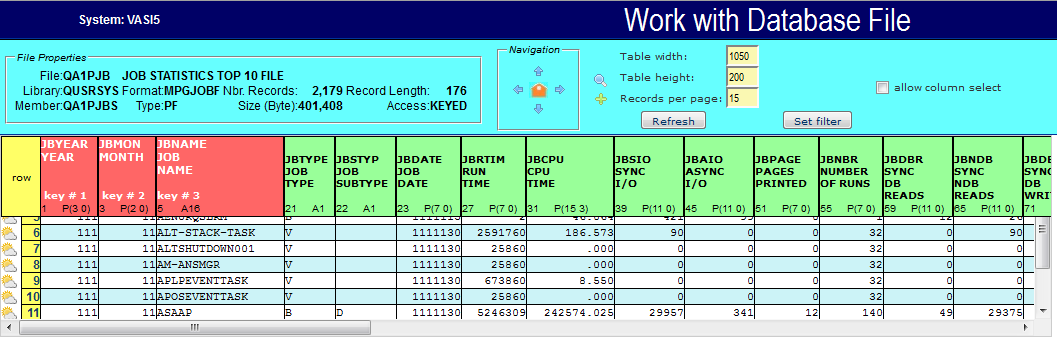
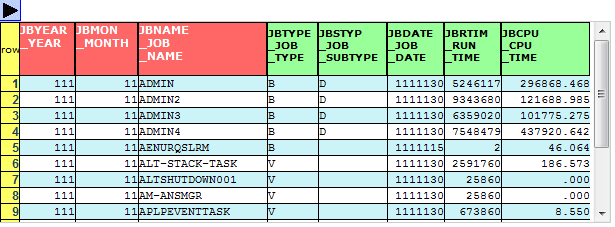
Figure 3 shows how a page of database file records is displayed in the record table.
Some comments:
- File properties - This small frame contains some general information about the database file.
- Column headers - Each field in the record format is a column, with a column header specifying:
- the field name
- its text description or column headings
- its disp0lacement in the record format
- its data type and length
Column headings of key fields show a red background color, whereas the column headers of other fields
display a green background color.
Key field column headings also display a key number.
- Navigation - Click
 to go back to the initial page (Figure 2) to go back to the initial page (Figure 2)
 to position at the beginning of the file to position at the beginning of the file
 to position at the end of the file to position at the end of the file
 to roll up the page to roll up the page
 to roll down the page. to roll down the page.
- Table width and Table height are the size - in pixel -of the record table. A vertical scroll bar and a horizontal scroll bar are available whenever needed.
To change the size of the table, use these fields and press the Refresh button.
These fields control the behavior of the Scrollable-Fixed-Header-Table feature.
- Note on the Scrollable-Fixed-Header-Table JQuery plugin
- This feature allows to keep field headers fixed while a record table is being scrolled.
The Scrollable-Fixed_header-Table feature is available only if the number of table cells does not exceed 2500.
When this limit is exceeded, the input fields Table width and Table height, an the checkbox Column select are not displayed.
- Records per page - Use this field to change the number of records in the table and press the Refresh button.
- Refresh button - Use it to re-display the records table.
- Allow column select - Check this box to allow selection of the columns to be displayed (more in the next topic).
- Highlight a record - When a record fields exceed the screen width, it may be useful
to highlight a record row. To highlight a record row, press the image
 at the beginning of the row.
4. Column selection
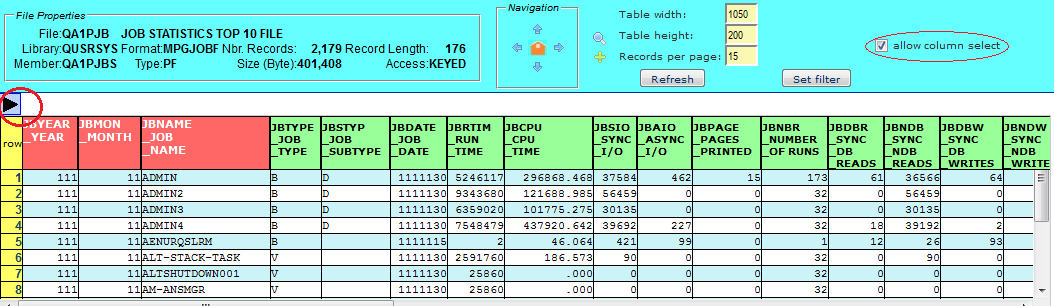
If you check the box Allow column select the records table is sligthly changed and a blue arrow is displayed over its left top corner (see Figure 3b):
 |
| Figure 3b - The Column selection feature |
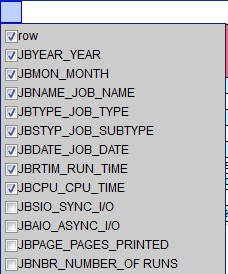 |
| Figure 3c - Selecting the desired columns |
If you then click the blue arrow, you may select only the columns you desired (see Figure 3c)
and the table is squized to contain just the selected column. To return to the full column table, just uncheck the box Allow column select.
 |
| Figure 3d - Only the desired columns |
Note on column selection- As mentioned earlier, this utility features a special Scrollable-Fixed-Header-Table JQuery plugin which is used to
- keep the colums heading rows steady while you scroll the table
- maintain the table within given sizes (width and height)
- let the user select the columns to be displayed.
The speed of this plugin is very sensitive to the number of cells (number of rows multiples by number of columns) in the table.
Therefore this plugin is disabled whenever the number of cells to be displayed in a table exceeds a given number (currently 2500).
In such a case, also some controls ( table width, table height, column select) are not displayed.
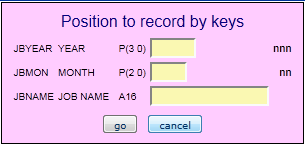
5. Position at a given record
To position a page at a given record, you press  . .
In case of a keyed file, you are asked to enter the desired record keys (Figure 4a).
For an arrival file, you are asked to enter the desired relative record number (Figure 4b).
 |
|
 |
| Figure 4a |
Figure 4b |
6. Add a record
To add record, you press  . .
For a keyed file, you receive a screen like the one in Figure 5a.
 |
| Figure 5a |
For an arrival file, you receive a screen like the one in Figure 5b.
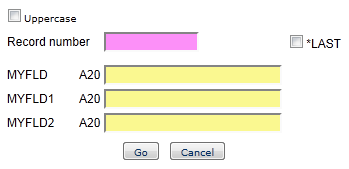 |
| Figure 5b |
Notes
- Click the checkbox Uppercase to force uppercase in the character fields.
When you do this, lowercase characters are replaced by uppercase caracters as soon as you exit from an input field.
- For arrival files, you must specify the relative record number of the record to be added.
If you want the record to be added at the end of the file, click the checkbox *LAST.
Alternatively, you can specify the relative record number of a record marked as deleted.
- Special attention deserve numeric fields with decimal digits.
In this case you must always type the decimal symbol
(period or comma, according to the national language of your box) followed by at least one decimal digit.
7. Update a record
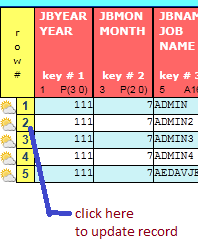 |
| Figure 6a |
To update a record, click on its row number (see Figure 6a).
You receive a screen like the one in Figure 6b.
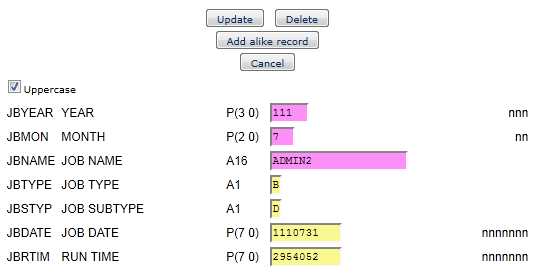 |
| Figure 6b |
After updating the desired fields, click button Update.
8. Delete a record
To delete a record, proceed as when you want to update it (Figure 6a and 6b), then press the Delete button.
9. Add an alike record
Sometimes you need to add a record which is very similar to an existing one, apart from a few fields that will be different.
Instead of using the procedure Add a record, select a similar record for update (Figure 6a and 6b), update fields as required,
then press the Add alike record button.
This saves you from keying in a lot of fields.
10. Using a filter
Very often your need is to check and to process a subset of database records meeting some given conditions.
In other words, you need to filter records, according to some rules.
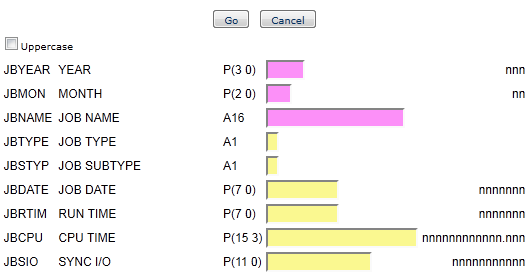
To filter records, press button Set filter in Figure 3.
You are then displayed a screen containing all the fields in the database record format (Figure 7a).
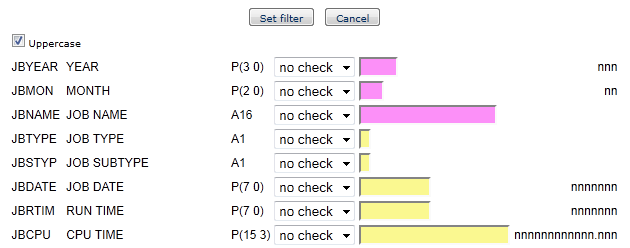 |
| Figure 7a |
For each field that you want to establish conditions for, click on the selection list

and select the appropriate condition among the following:
| |
no check: | this field must not be used in the filter |
| *EQ: | the field value must be the same (equal) as the compare value (specified in the input field on the right) |
| *NE: | the field value must be different (not equal) from the compare value |
| *LT: | the field value must be lower than the compare value |
| *LE: | the field value must be lower or equal to the compare value |
| *GT: | the field value must be greater than the compare value |
| *GE: | the field value must be greater or equal to the compare value |
| *LK: | (alfanumeric fields only) - the field value must be "like" the compare value |
NOTES
- Case sensitivity - Compare values are always case sensitive, except for the operator *LK.
- Special compare values
- The compare value of an alfanumeric field can be a generic string. Example:
- The compare value of the *LK operator is a case-insensitive mask based on two wild characters:
- character % replaces any number of characters
- character _ (underscore) replaces a single character.
Examples:
- %bank intercepts SanPaolo Bank, Millenniumbank, etc.
- mi% intercepts Miller International Inc., Millenniumbank, etc.
- %old intercepts completely sold, very old, etc.
- %transport% intercepts Minitransport S.p.A., H & R Transport Ltd, etc.
- %sys%co% intercepts Tron Computer Systems Corporation, SYSCO Food Services of L.A., etc.
- gr_ss% intercepts grass and gross.
11. Forcing a database file filter for all users
The use of this tool should be restricted to the IT staff supporting the IBM i installation.
The access should be restricted to a limited number of users, see "Restricting the access to this utility".
Even so, there could be the need to force record filtering on some sensitive database files.
Command CGIWRKDBF/FRCFILTER (Force filter) allows to do that:
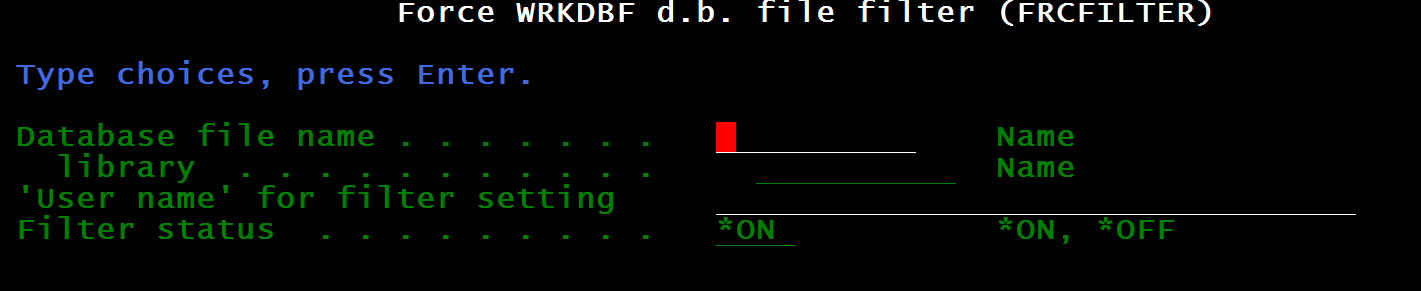 |
| Figure 8 |
This command forces all users of the WEB WRKDBF program to adopt a given record filter when accessing a specified database file.
Such record filtering cannot be removed. Only the originator of the filter is not subject to this rule.
- Access to the WEB WRKDBF program must have been secured through a valdation list or a PasswdFile %%SYSTEM%% HTTP directive.
- The use of this command is restricted to CLASS(*SECOFR) user profiles.
- The record filter mentioned in this program must already have been defined using the WEB WRKDBF program.
Anytime the record filter is changed, this command must be re-executed with STATUS(*ON) to force the same record filtering for all the other users.
Data Base file name (FILE) - Qualified name of the database for which a WRKDBF record filter has already been defined.
User name (USER) - The user-name one logged in through program protection to define the record filter. The user-name is 30 max. character case sensitive value.
Use uppercase letters if the protection was through system user profiles.
Filter status (STATUS) - Specify:
- *ON to force the filter for all users (except the originator)
- *OFF to disable the filter for all users.
|


